Serving Large Language Models at Scale with LiteLLM and vLLM on Alibaba Cloud ACK
Once a team starts using more than one open-source LLM, things get messy fast. Every model wants different hardware, a different deployment, and a different endpoint for developers to remember. I built a reference platform on Alibaba Cloud ACK that hides all of that behind one OpenAI-compatible endpoint, and this is how it works.
The stack:
ACK for container orchestration
vLLM for high-performance GPU inference
LiteLLM as the unified API gateway
OSS for model storage, mounted with PV/PVC
Open WebUI to validate that everything works
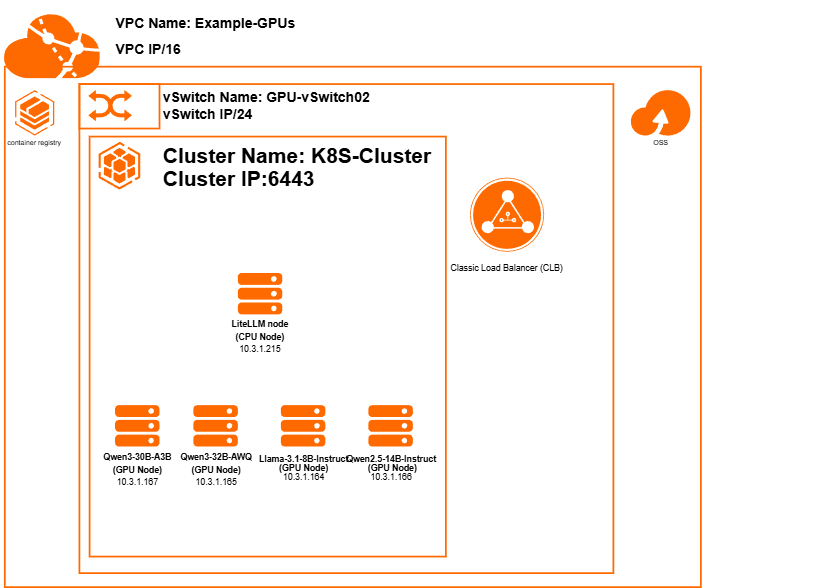
Architecture
High-level design of the multi-model LLM platform on ACK
The diagram is also available as an editable draw.io file, so you can adapt it to your own environment:
Model weights are tens of gigabytes. Downloading them every time a pod starts makes startups slow and unpredictable. Instead, the models are uploaded to OSS once and mounted straight into the vLLM pods:
Giving the PV access to the bucket (AccessKey + SecretKey)
The PV mounts the bucket through the OSS CSI driver, which needs credentials to read it. So before creating the PV you need an AccessKey ID and AccessKey Secret:
In the RAM console, create a RAM user just for this (never use the root account keys).
Grant it only what it needs. Read access to the models bucket is enough for serving, so AliyunOSSReadOnlyAccess, or a custom policy limited to that one bucket. Use AliyunOSSFullAccess only on the user you upload models with.
Open the user and click Create AccessKey. Copy the AccessKey ID and Secret right away, because the secret is shown only once.
Store them in a Kubernetes Secret in the same namespace as the models:
Bind it with a PVC (qwen3-32b-awq-pvc in the manifests) and the vLLM pod can mount the model folder.
Security notes: never commit the keys to Git, keep the RAM user read-only, use the internal OSS endpoint (-internal) so traffic stays inside the VPC, and rotate the AccessKey regularly.
Uploading the models to OSS
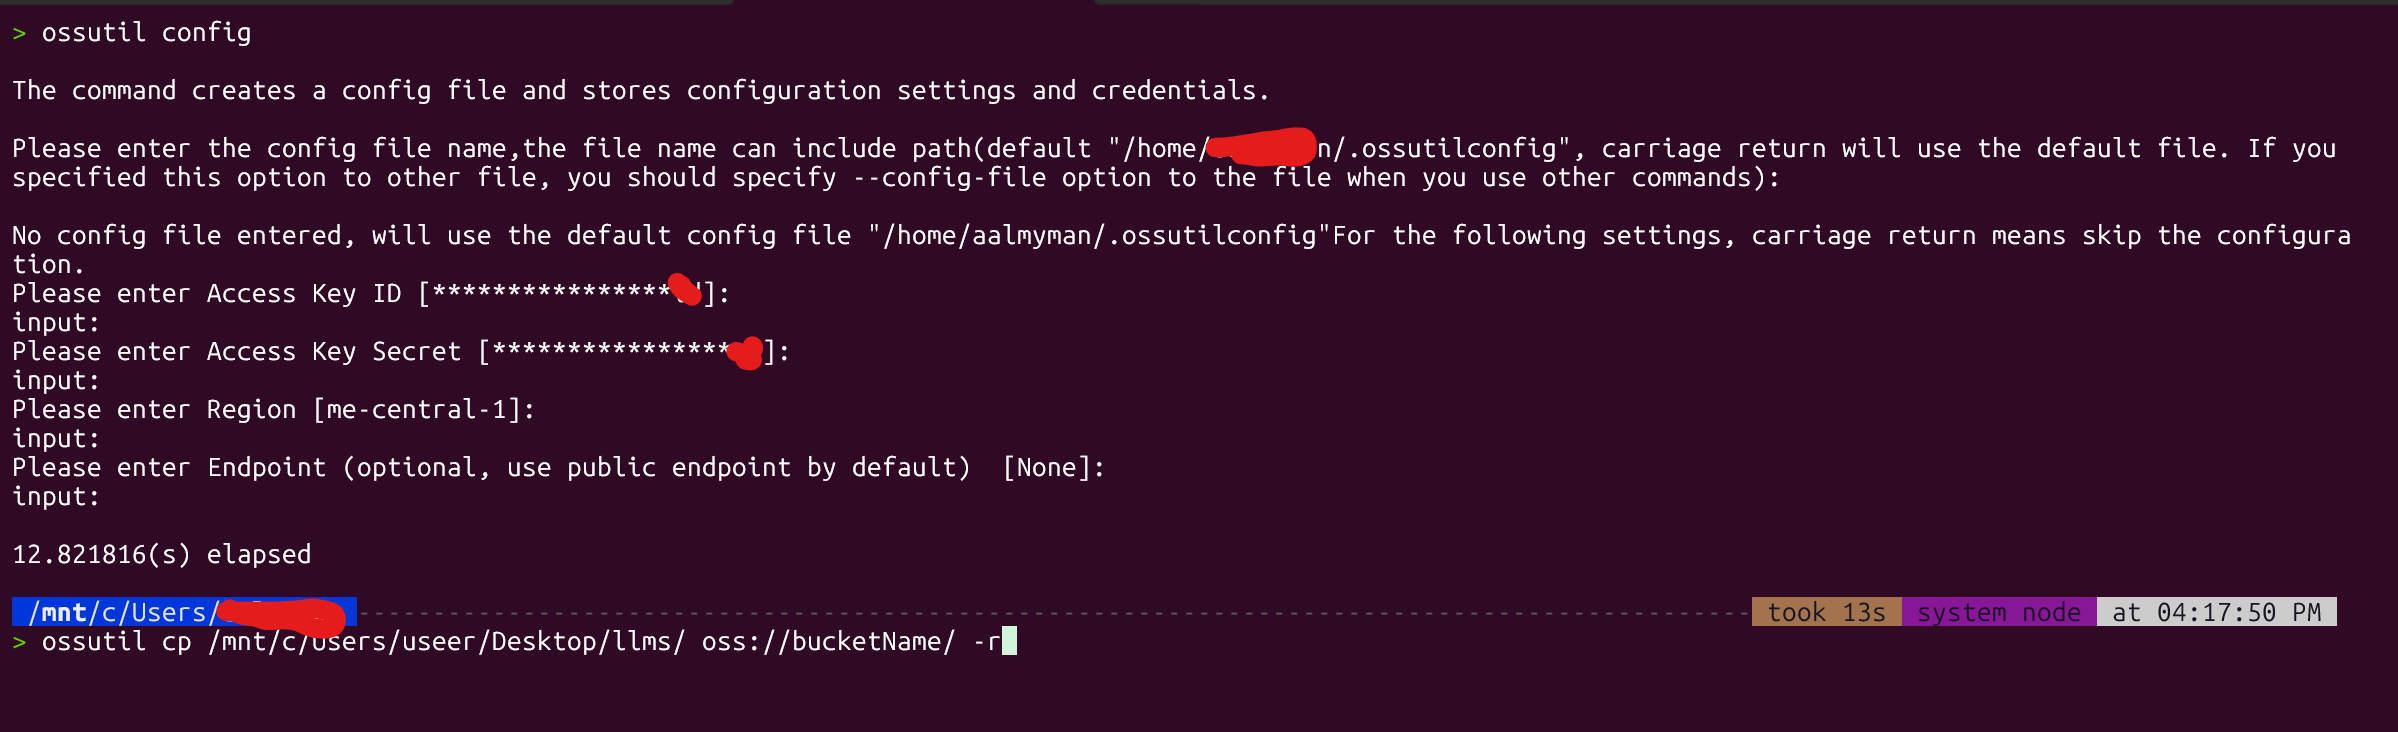
Install ossutil, then run ossutil config once. It asks five things, and only some of them need an answer:
Prompt
What to do
Config file name
Press Enter (use the default ~/.ossutilconfig)
Access Key ID
Type it (the RAM user's AccessKey ID)
Access Key Secret
Type it (the RAM user's AccessKey Secret)
Region
Type it, for example me-central-1
Endpoint
Press Enter (the public endpoint is used by default)
ossutil config: press Enter for the config file and the endpoint, but type the AccessKey ID, AccessKey Secret and region
For uploading, use a RAM user that is allowed to write to the bucket. The read-only user above is only for the PV.
Now there are two ways to upload, depending on how many models you have.
2. Many models at once (better when you pull a lot from Hugging Face): clone every model with Git LFS into one local folder, one sub-folder per model, then upload the whole folder to the bucket root in a single command:
bash
sudoaptinstall git-lfs -ygit lfs installmkdir-p ~/llms &&cd ~/llms
# clone from Hugging Face (gated models such as Llama need your HF username + access token)git clone https://huggingface.co/Qwen/Qwen3-32B-AWQ
git clone https://huggingface.co/Qwen/Qwen2.5-14B-Instruct
git clone https://huggingface.co/meta-llama/Llama-3.1-8B-Instruct
# optional: drop the .git folders, they roughly double the size you uploadrm-rf ~/llms/*/.git
# upload everything to the root of the bucketossutil cp-r ~/llms/ oss://modelshugging/
Check the result with ossutil ls oss://modelshugging/. Each model should now be a folder at the bucket root, which is the layout the PVs expect (path: /Qwen3-32B-AWQ).
Creating the PV and PVC from the ACK console
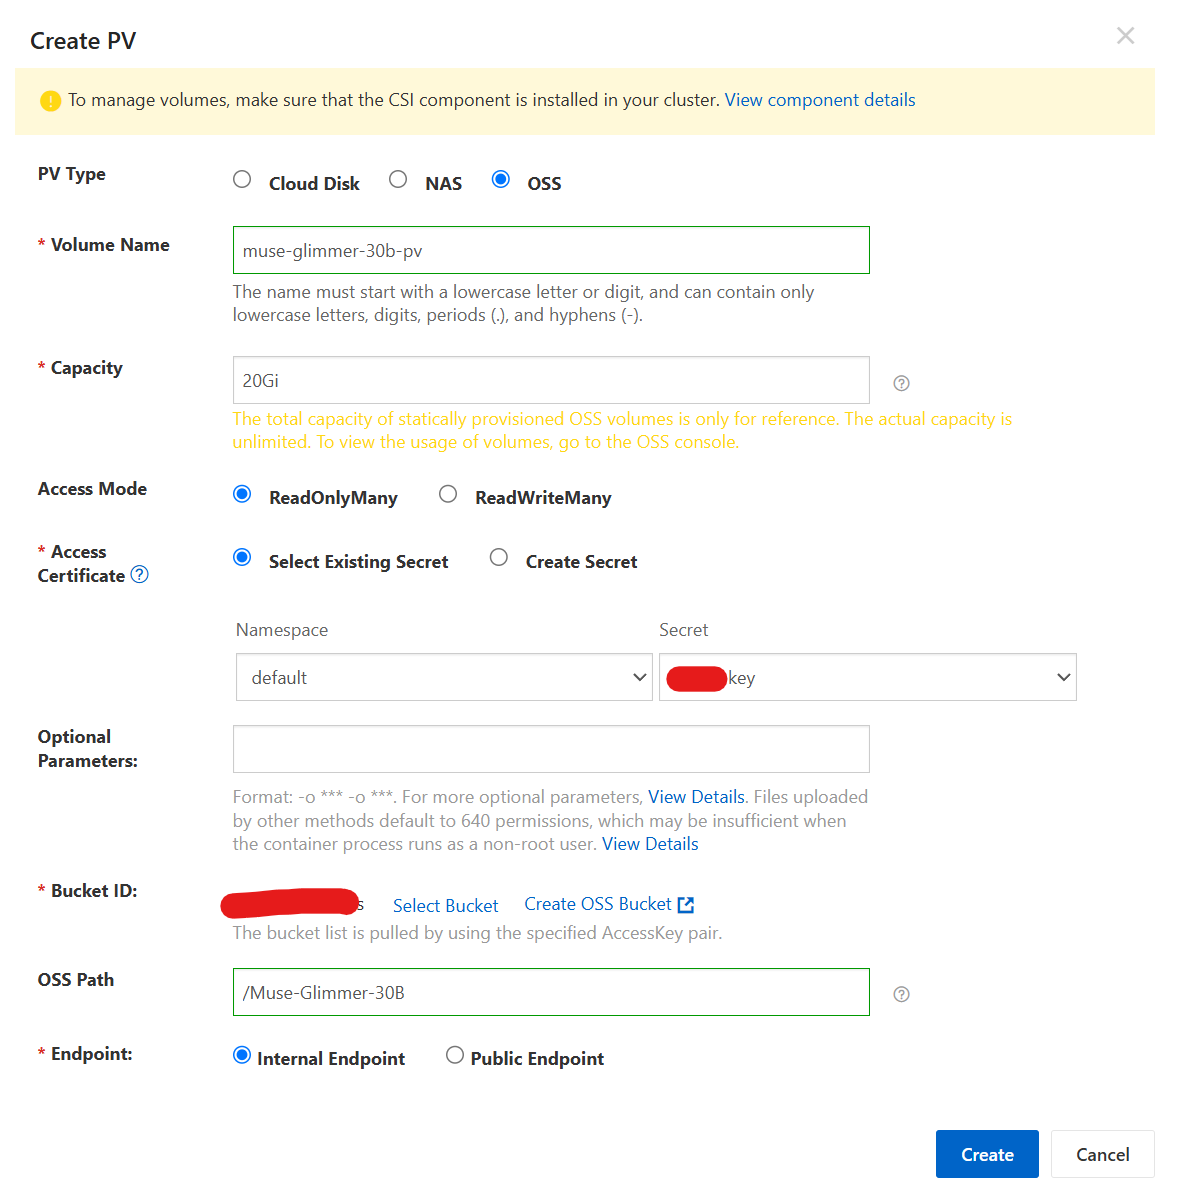
Instead of hand-writing the YAML above, you can create both from the ACK console under Storage. It is faster and less error-prone, as long as these details are right.
Create PV in the ACK console with the OSS type, the model's OSS path, the existing secret and the internal endpoint
PV Type:OSS.
Volume Name:<model>-pv, all lowercase, for example qwen3-32b-awq-pv. Use the same model name for the PVC so they are easy to match.
Capacity: only a reference value for OSS (the real capacity is unlimited), so pick something at least as large as the model, such as 20Gi.
Access Mode:ReadOnlyMany. The pods only read the weights.
Access Certificate: choose Select Existing Secret, then the namespace and the Secret that holds your AccessKey ID and AccessKey Secret (the oss-secret from the previous step). The bucket list in the next field is loaded with this AccessKey, so if the bucket doesn't show up, the keys or their permissions are wrong.
Bucket ID: select your models bucket.
OSS Path: the folder of this one model, at the bucket root, written exactly as it appears in the bucket, for example /Muse-Glimmer-30B. It is case-sensitive, and it must match what you uploaded with ossutil (oss://modelshugging/Muse-Glimmer-30B/). A wrong path mounts an empty folder and vLLM then fails with "model path not found".
Endpoint:Internal Endpoint, so traffic stays inside the VPC.
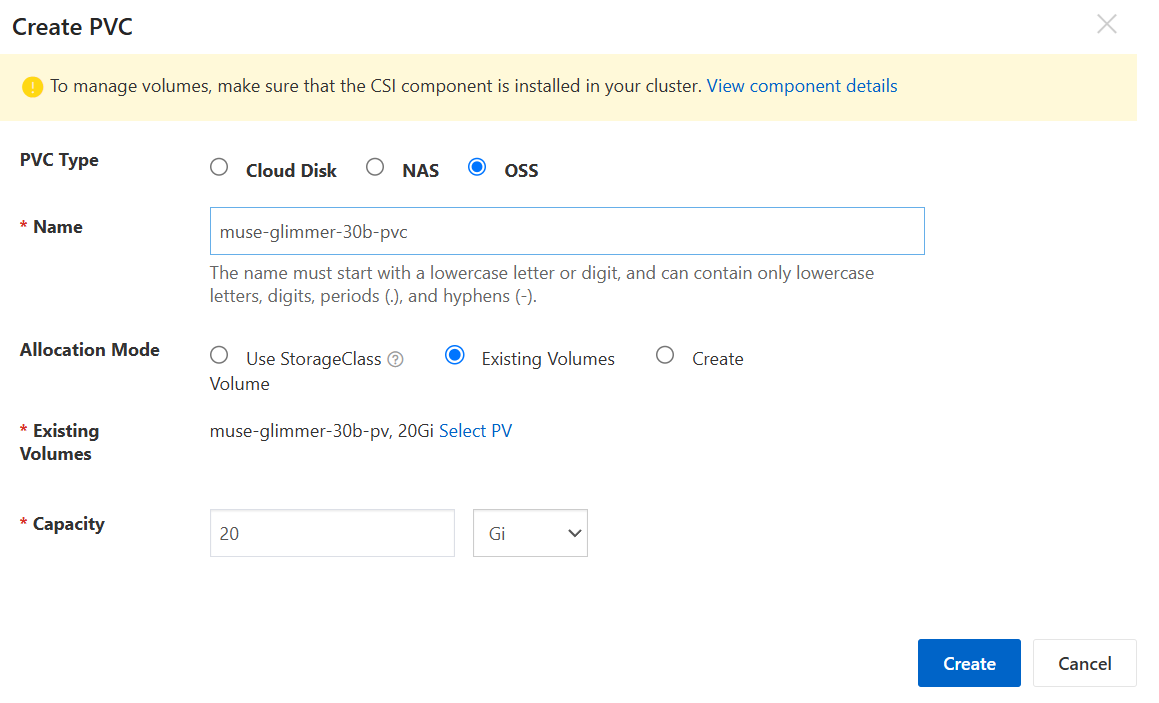
Create PVC in the ACK console bound to the existing OSS volume
PVC Type:OSS.
Name:<model>-pvc, for example qwen3-32b-awq-pvc. This exact name goes into the Deployment as claimName, so a typo here means the pod stays in Pending.
Allocation Mode:Existing Volumes, then Select PV and pick the PV you just made.
Capacity: the same value as the PV (20Gi).
Create the PVC in the same namespace as the vLLM pods.
Naming rule of thumb: one model, one folder, one PV, one PVC, all with the same name.
Model folder in OSS
OSS Path
PV
PVC
Qwen3-32B-AWQ
/Qwen3-32B-AWQ
qwen3-32b-awq-pv
qwen3-32b-awq-pvc
Qwen2.5-14B-Instruct
/Qwen2.5-14B-Instruct
qwen2.5-14b-instruct-pv
qwen2.5-14b-instruct-pvc
Check that both are bound before you deploy the model:
bash
kubectl get pvkubectl get pvc -n your-namespace
Both should show Bound.
Important: mind the namespace. A PV is cluster-wide, but a PVC lives in a namespace. The console creates the PVC in whichever namespace is selected at the top of the page, and that is default if you never changed it. The vLLM Deployment must be in that same namespace, or it can't find the claim. The same goes for every kubectl command: without -n, kubectl only looks in default, so a PVC in another namespace seems to be missing.
bash
# PVC in the default namespacekubectl get pvc
# PVC in your own namespacekubectl get pvc -n your-namespace
# or set it once so you can drop -n from every commandkubectl config set-context --current--namespace=your-namespace
Pick one namespace for the whole stack (PVCs, the OSS Secret, the models and LiteLLM) and use it everywhere, including the namespace: field in the YAML manifests. The Deployment then mounts it with the PVC name (claimName: qwen3-32b-awq-pvc) and the model path from vllm serve.
How a request flows
The user reaches the cluster through the Load Balancer / Ingress.
The request lands on LiteLLM, running on the CPU node.
LiteLLM reads the requested model name and forwards to the matching vLLM service.
vLLM runs inference on its GPU and returns the response.
LiteLLM hands it back in the standard OpenAI format.
Because every model is registered in LiteLLM's config, switching models is just changing the model field in your request. Existing OpenAI SDK code works as is.
Container images and internet access (NAT Gateway)
The manifests pull both images straight from Docker Hub:
image: vllm/vllm-openai:latest # model Deploymentsimage: litellm/litellm:latest # LiteLLM Deployment
Cluster nodes in a private VPC have no route to the internet, so these pulls will hang in ImagePullBackOff unless you give them one. The simple way is to create the resources on Alibaba Cloud yourself:
Create a NAT Gateway in the cluster's VPC.
Create an Elastic IP (EIP) and associate it with the NAT Gateway.
Add an SNAT entry for the vSwitches the ACK nodes use, so the nodes can reach the internet through the EIP.
Both of these cost money (the NAT Gateway and the EIP), and the model weights are not downloaded through them, because those come from OSS over the internal endpoint. The same NAT also lets pods reach Hugging Face or other external APIs if you need that.
If you can't open outbound access, or you hit Docker Hub pull limits, push the two images to your own ACR registry instead and replace the image: lines with your ACR address.
Check that the pull worked with kubectl describe pod <pod-name> -n your-namespace, and look at the Events at the bottom.
Deploying a model with vLLM
Each model is a Deployment plus a ClusterIP Service. This is the heart of the Qwen3 32B AWQ one:
The gateway itself is exposed through an internal LoadBalancer Service. Adding a model later means one new vLLM Deployment and one new entry in this list.
Why Redis? Caching in LiteLLM
The LiteLLM config also turns on a Redis cache:
yaml
litellm_settings:cache:truecache_params:type:"redis"host:"redis-master"# your Redis addressport:6379password:"your_redis_password"ttl:300# seconds a cached answer is keptnamespace:"litellm_cache"
Why it is in this project:
Saves GPU time: when the same request (same model, messages and parameters) arrives again, LiteLLM answers from Redis and never touches vLLM. GPUs are the expensive part, and repeated prompts are common (health checks, tests, popular questions, retries).
Faster answers: a cache hit returns in milliseconds instead of waiting for generation.
Shared by every replica: the cache lives outside the LiteLLM pod, so it survives restarts and stays consistent if you scale LiteLLM to more than one pod. An in-memory cache would be lost on every restart.
Expires on its own:ttl keeps old answers from living forever, and namespace keeps this cache separate from anything else using the same Redis.
If you don't need caching, set cache: false and remove cache_params. LiteLLM works without Redis.
Getting the Redis URL and password
You need an instance first, and you copy two things from it into the config: the connection address (host and port) and the password.
Create a managed Redis instance on Alibaba Cloud by following the Tair (Redis OSS-compatible) documentation. Put it in the same VPC as the cluster, use its private connection address as host, and set or reset the account password in the instance console.
Or run Redis inside the cluster (the example config uses a Service called redis-master) and follow the Redis documentation to set a password.
Then put the address and password in litellm-config.yaml before you deploy. Treat the password like any other secret and don't commit the real value to Git.
Validating with Open WebUI
To check the whole chain (routing, inference, networking, OSS-backed loading), I pointed Open WebUI at LiteLLM:
If every model shows up in the dropdown and answers, the platform works end to end.
Scaling and performance notes
Single GPU: quantize (AWQ, BitsAndBytes), use continuous batching, and watch nvidia-smi.
70B+ models: use vLLM tensor parallelism across 2-4+ L20s.
More throughput: add GPU nodes and replicas behind the same LiteLLM entry.
Debugging cheat sheet
Most problems I hit were one of these:
Pod stuck in Pending: not enough GPU/CPU/memory, or the PVC isn't bound. Check kubectl describe pod and kubectl get events --sort-by='.lastTimestamp'.
CrashLoopBackOff: wrong model path, OOM, bad container args, or no GPU available. Use kubectl logs <pod> --previous.
Rollout stuck:kubectl rollout status, and kubectl rollout undo to get back to a working version.
YAML won't apply: validate first with --dry-run=client.
What's next
Gemma 3 27B and bigger models through multi-GPU tensor parallelism
Multi-region ACK for HA/DR
RAG pipelines and agentic workloads on top of the gateway
Cost optimization with spot instances
Conclusion
Putting LiteLLM in front of vLLM turns a pile of GPU deployments into a single, boring API, and boring is exactly what you want from infrastructure. Grab the draw.io file above and adapt the design to your own setup.